Wednesday, September 23, 2015

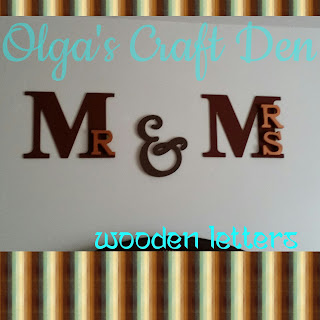
DIY Mr. & Mrs. Lettering for the Master Bedroom:

Mr. & Mrs.


I've been doing so many projects for my
princess' room that I ignored the rest of the house!!!
So I decided to make this little simple & beautiful 
project for our room.
And I love the way it turned out.


Materials:

  • 2 Big M's
  • 2 Small R's
  • 1 Small S's
  • 1 "&"
  • Acrylic Paint (Which ever colors you like)
  • Paint brushes
  • Wooden Glue (I used Tacky Glue)
  • Tissue & a Bowl of Water (To clean the brushes)


Now paint the letters and make sure you paint the 
edges so it gives the letter the 3D effect.
I painted the small letters "Metallic Bronze"
It made the letters look amazing 
and different.


After all is done let the letters dry for a little while.
That's why I use acrylic paint it dries so fast and even.


Now that the letters are dry, it's time to glue the small letters
to the big "M's".
Note: Make sure that the "S" & the "R"
are aligned straight.
I used a ruler to make sure they came out 
straight.


Let the glue dry for a little while, In the meantime 
brainstorm where you would like to place 
this beautiful project on.

And after they are up on the wall sit back and 
admire your hard work....

Hope everyone enjoys this post...

Don't forget to Like, Comment or Share...


Also you could follow me on Facebook, Tumblr or Pinterest!!!

 Have a nice day everyone...

Thursday, September 17, 2015

DIY Wooden Letters Part 2


DIY Initial & Name for the Door: 


Hello Craftiniers, On today's post I'll
be sharing my newest project!!!

I was going through Pinterest!!!
& found the most gorgeous ideas
for decoration for kids rooms...
So I decided to put a twist and make one
for my princess with her own theme!!!


First you'll need:
  • The First Letter to the name you prefer
  • The whole name spelled out with small lettering
  • Wood glue
  • Acrylic Paint
  • Paint Brushes
  • Rhinestones
  • A Bowl with Water (To clean the brushes)
  • Ribbon Or Rope
  • Staple gun & Staples
  • Glitter (optional)


Paint the letters with the colors you chose.
Be creative, play around with the colors you'll be amazed
with what you are capable of creating!!!


After that let it dry for a couple minutes!!!

Now is the fun job gluing the letters & putting your creation together
I found this at A.C Moore Arts & Crafts,
Which btw is my most favorite store next to
JoAnn.


Once you're done with that staple the rope at the back and
make a little knot so the rope won't slide from the staple.

And place it on the preferred place of
your choosing!!!

Hope you guys enjoy this post...
I love sharing my projects with everyone...
I want to inspire as much as I can &
Help everyone be creative!!!

Don't forget to Like, Comment or Share...

Also you could follow me on Facebook, Tumblr & Pinterest!!!


Tuesday, September 15, 2015

DIY Covering Plastic Drawers!!!

From Ordinary to Extraordinary:


I dislike that you could see the things you have in these
plastic drawers.
So I decided to cover them with 
scrapbook paper, which came out to be AWESOME!!!

All you need is as follow:
  • Scrapbook paper (Any design you like, make sure is not thick paper)
  • Scissors
  • A Pencil
  • A Ruler
  • Scotch Tape
  • Double Sided Tape
  • & Of Course the Drawers...


I measure the paper in the inside of the drawer, and mark it 
with a pencil.
After that I cut it and put double side tape on the 
side of the paper that has the design.
The scotch tape is for the side of the paper with no design,
so every time I put clothes I won't ripe the paper off.

When I was done with all the drawers I put my princess clothes back
in it and put it back where it was.
She loves it, and it made me so happy!!!

Hope every one enjoys my posts...
Have a amazing day!!!

Don't forget to Like, Comment or Share...

Also Connect with me on my other pages!!!
Facebook, Pinterest, & Tumblr...

Ciao, Craftiniers!!!


Wednesday, September 9, 2015

DIY Decorating Wooden Letters-

A Colorful & Easy DIY:


I been wanting to do these for a while now.
But every time I used to go to Walmart or Michael's 
they didn't have the letters I needed & it was so
frustrating for me.
But I finally found them & got it done!!!!


Materials:

  • Wooden Letter 
  • Acrylic Paint (Any Color, or Brand)
  • Paint Brushes
  • Decorations (It could be stickers, rhinestones, etc...)
  • Glue (I prefer Fabric Glue, But you could use the Hot Glue Gun)
  • Stapler & Staples (This is for the ribbon, to hold them up on the wall)
  • Ribbon (Any Color or Texture)
  • Scissors
  • A Bowl with Water (To clean the paint brushes)
  • A Hammer & Nails (For when you done!)

Just have fun with this project!!!
Is so relaxing & you paint all the stress away, Lol.
And the awesome part it makes the room
look beautiful & breathtaking.


Hope you guys enjoy my ideas!!!

Follow me on Facebook...

Don't forget to Like, Comment or Share!!!

Friday, September 4, 2015

The 2nd DIY Girl's Dress

I made another one, because I couldn't help myself!!!
I fell in love with the first one that I had to do it 
again...


I love the colors & the material. Is perfect for winter time!!!


Follow me on Facebook & Tumblr....
Hope everyone enjoy!!!